The Deep Litter Method (DLM) is a game-changer for poultry keepers seeking efficiency, sustainability, and healthier birds. By transforming your coop into a living composting system, you can eliminate frequent mucking, harness natural warmth in winter, and produce nutrient-rich compost. This guide breaks down the science, step-by-step implementation, and troubleshooting tips to master DLM with confidence.
The Why: Wet vs. Deep Dry Litter
Traditional 'wet litter' systems—where moisture from droppings and urine sits in bedding—create a breeding ground for ammonia, pathogens, and respiratory issues. In contrast, deep dry litter leverages composting principles to convert waste into beneficial byproducts.
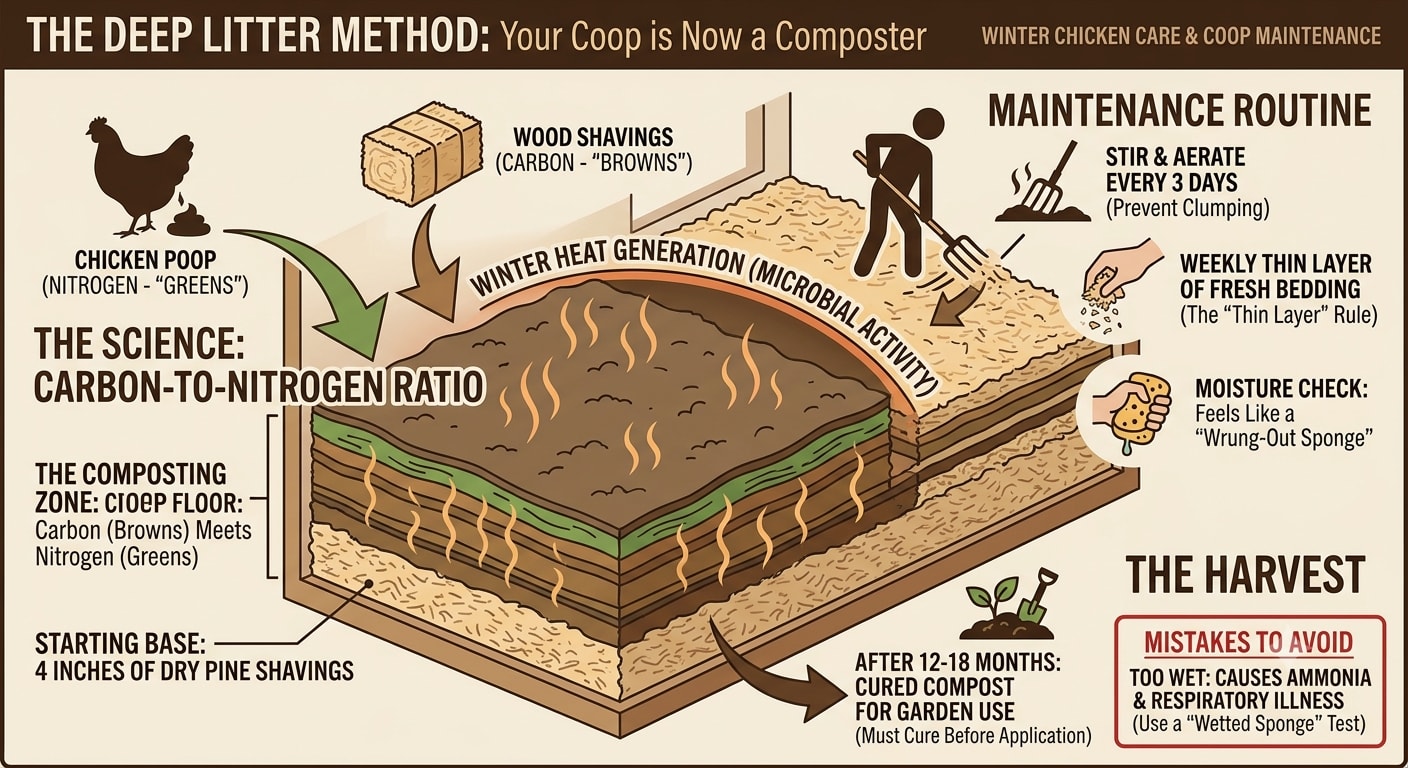
Science of Composting: Composting relies on a balance of carbon ('browns') and nitrogen ('greens'). Chicken droppings (high in nitrogen) are 'eaten' by carbon-rich materials like wood shavings, leaves, or straw, fostering microbial activity that generates heat and neutralizes odors.
Carbon-to-Nitrogen Ratio: Aim for a 25:1 to 30:1 ratio. For every 10 pounds of droppings, add 250–300 pounds of carbon material to maintain optimal decomposition.
Getting Started: Step-by-Step Setup
Base Layer (4 Inches of Pine Shavings)
Use untreated, coarse pine shavings (avoid sawdust, which decomposes too quickly). Fill the coop floor evenly, ensuring full coverage.
The Stirring Routine (Aeration is Key)
Every 3 days, use a pitchfork to turn the litter in 6-inch increments. This prevents clumping, introduces oxygen, and distributes moisture evenly.
Weekly Additions: The 'Thin Layer' Rule
Add a 1/4-inch layer of fresh carbon material (shavings, dried leaves, or straw) weekly. This maintains depth and absorbs new droppings.
Moisture Management: The 'Sponge Test'
Grab a fistful of litter and squeeze. It should feel damp but not drip—like a wrung-out sponge. If overly wet, add more carbon; if too dry, lightly mist with water.
Troubleshooting Common Issues
Ammonia Smell: Immediate sign of excess nitrogen. Add 2–3 inches of carbon material to rebalance the ratio.
Dustiness: Mist the litter lightly with water (avoid over-saturation) to reduce airborne particles.
Cold Coop: Ensure adequate litter depth (6–8 inches in winter). The composting process generates heat, but sufficient insulation is critical.
The Harvest: When to Remove Compost
After 12–18 months, the litter transforms into a dark, crumbly, earthy material. This is 'finished compost,' rich in nutrients for gardens. However, do not apply directly to vegetable beds. Instead:
Cure the Compost: Move it to a separate pile and let it sit for 4–6 weeks. This eliminates potential pathogens and stabilizes nutrients.
Use in Gardens: Mix with soil or use as mulch for fruit trees, ornamentals, or non-edible plants. Avoid using near root vegetables until fully cured.
Mistakes to Avoid: The Silent Killer
Over-Wetting: Excess moisture creates anaerobic conditions, leading to foul odors and respiratory infections. Prioritize dryness and aeration.
Skipping the Stirring: Inactive litter leads to compaction and ammonia buildup. Consistency in turning is non-negotiable.
Using the Wrong Carbon Source: Avoid cedar or aromatic woods, which can harm birds. Stick to pine or neutral materials.
Conclusion: Your 30-Day Challenge
The Deep Litter Method is a proven system that rewards patience with time savings, healthier birds, and garden gold. Start today: set up your base layer, commit to the 3-day stirring routine, and witness the transformation over the next month. By day 30, you’ll have a cleaner coop, warmer winter environment, and the foundation of a thriving compost ecosystem.
Keywords: deep litter method, coop maintenance, chicken composting, winter chicken care